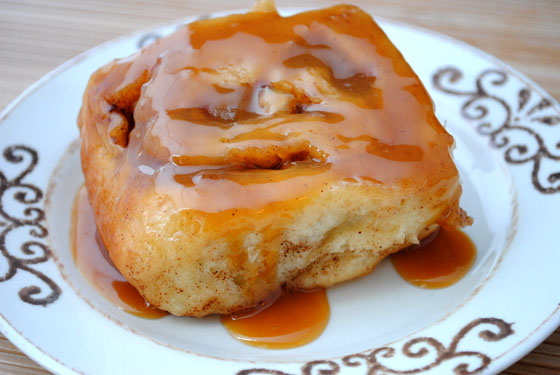
I should’ve named these 1 a.m. sticky buns. I don’t know why, but I always get an itch to bake bread late at night. And every single time I forget that baking bread from scratch is quite the lengthy process. So when I started these at 8:30 at night, I didn’t think about staying up until 1 a.m. to finish them! I had a variety of apples I needed to use and I wanted to make something new. No apple pie, no apple crisp, nothing that reminded me of fall would do. Then I thought about cinnamon rolls and how delicious the pumpkin version turned out. Why not apple? I turned to the best book in bread baking and found sticky buns. Aha! Let’s make Apple Sticky Buns!
So, how’s it taste?
God these were so good. I’m not a huge fan of apple desserts. I’ll almost always choose another fruit flavor over apple, but it’s such a classic. The soft, cinnamon apple filling went perfectly with the sticky bun. The buns are very soft with a delicate hint of lemon that makes them phenomenal. Although it’s a long process from start to bite, it was pretty easy with the help of a mixer. There’s a part in the directions where you can put the dough in the refrigerator and bake them later. I did make quite a mess rolling up the apple-filled dough, but getting your hands dirty in the kitchen is part of the fun! If you’d prefer regular sticky buns, just leave out the apple filling and follow the rest of the directions. This recipe makes a lot of sticky buns, but they freeze very well. I wrapped the buns individually in plastic wrap and put them all in a freezer bag. Microwave one in the microwave for 20-30 seconds on defrost and you’ve got a stellar breakfast!

Apple Sticky Buns
adapted from The Bread Baker's Apprentice
makes 8 to 12 large or 12 to 16 small sticky buns
Ingredients:
Sticky Buns
6 1/2 tbsp. sugar
1 tsp. salt
5 1/2 tbsp. unsalted butter, room temperature
1 egg, slightly beaten
1 tsp. grated zest of 1 lemon
3 1/2 cups bread flour
2 tsp. instant yeast
1 1/4 cups buttermilk, room temperature
1/2 cup cinnamon sugar (6 1/2 tbsp. sugar + 1 1/2 tbsp. ground cinnamon)
Apple Cinnamon Filling
3 tbsp. unsalted butter
4 apples, cut into bite-sized chunks (I used a mixed variety but Granny Smith work well)
6 tbsp. brown sugar
6 tbsp. honey
1 1/2 tsp. ground cinnamon
1 tbsp. fresh lemon juice
Caramel Glaze
1/2 cup sugar
1/2 cup brown sugar
1/2 tsp. salt
1 cup unsalted butter, room temperature
1/2 cup corn syrup
1 tsp. pure vanilla extract
Directions:
1. For the sticky buns, cream together the sugar, salt, and butter on medium-high speed in an electric mixer with a paddle attachment. Whip in the egg and lemon zest until smooth. Then add the flour, yeast, and buttermilk. Mix on low speed until the dough forms a ball. Switch to the dough hook and increase the speed to medium, mixing for approximately 10 minutes, or until the dough is silky and supple, tacky but not sticky. You may have to add a little flour or water while mixing to achieve this texture. Lightly oil a large bowl and transfer the dough to the bowl, rolling it around to coat it with oil. Cover the bowl with plastic wrap.
2. Ferment at room temperature for approximately 2 hours, or until the dough doubles in size.
3. Meanwhile, for the apple filling, heat the butter in a large sauté pan over medium heat. When bubbling, add the apples and sauté 4 to 6 minutes until softened. Stir in all remaining ingredients and set aside to cool on the counter or in the refrigerator.
4. Mist the counter with spray oil and transfer the dough to the counter. Roll out the dough with a rolling pin, lightly dusting the top of the dough with flour to keep it from sticking to the pin. Roll it into a rectangle about 2/3 inch thick and 14 inches wide by 12 inches long for larger buns, or 18 inches wide by 9 inches long for smaller buns. Don't roll out the dough too thin, or the finished buns will be tough and chewy rather than soft and plump.
5. Sprinkle the cinnamon sugar over the surface of the dough. Scoop the apple cinnamon filling over the cinnamon sugar, leaving about 1/2-inch edge. You may have leftover filling.
6. Roll the dough into a log, creating a cinnamon sugar spiral as you roll. With the seam side down, cut the dough into even pieces about 1 3/4 inch thick for larger buns; or 1 1/4 inch thick for smaller buns.
7. For the caramel glaze, combine the sugar, brown sugar, salt, and butter in the bowl of an electric mixer. Cream together for 2 minutes on high speed with the paddle attachment. Add the corn syrup and vanilla. Continue to cream for about 5 minutes or until light and fluffy.
8. Coat the bottom of 1 or more baking dishes or pans with sides at least 1 1/2 inches high with 1/4-inch layer of the caramel glaze. Refrigerate and save any excess for future use. It will keep for months in a sealed container.
9. Lay the pieces of dough on top of the caramel glaze, spacing them about 1/2 inch apart. Mist the dough with spray oil and cover loosely with plastic wrap.
10. Proof at room temperature for 75 to 90 minutes, or until the pieces have grown into one another and nearly doubled in size. You may also retard the shaped buns in the refrigerator for up to 2 days, pulling the pans out of the fridge 3 to 4 hours before baking to allow the dough to proof.
11. Preheat the oven to 350F with the oven rack on the lowest shelf for sticky buns. Bake the buns for 30 to 40 minutes or until golden brown. Remember sticky buns are upside down, so the heat has to penetrate through the pan and into the glaze to caramelize it. The tops will become the bottoms, so they may appear dark and done, but the real key is whether the underside is fully baked.
12. Coll the buns in the pan for 5 to 10 minutes and then remove them by flipping them over onto another pan. Carefully scoop any glaze back over the buns with a spatula. Wait at least 20 minutes before serving.


 Print
Print


That looks really good and that caramel glaze is calling my name.