Butterfinger Pie
It’s not a bad gig being the official birthday treat-maker at work. It gives me an excuse to make some decadent goodies like Fresh Lemonade Cake, Chocolate Chip Cookie Dough Whoopie Pie Cake, and Tunnel of Fudge Cake. I love baking treats for others and any excuse to whip up something sweet when I’m counting calories isn’t so bad. I mean I have to, right? A little cheating now and then doesn’t hurt, but this Butterfinger Pie will make you want to grab a fork and forget you ever heard the word “calorie.” Trust me, the splurge is worth it. I first made this pie years ago before this blog was ever created. Shame on me for taking years to share it with you. If you’re a fan of Butterfinger, or peanut butter, or chocolate, you are going to fall head over heels for this dessert!

So, how’s it taste?
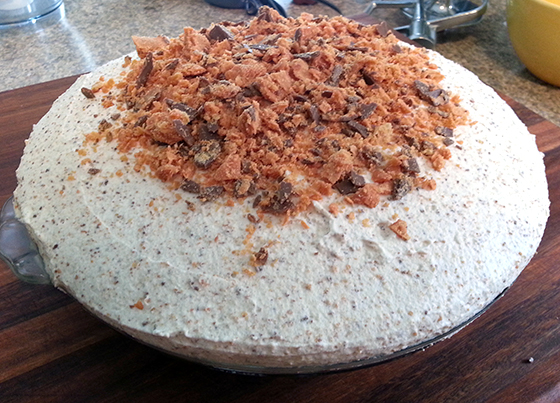
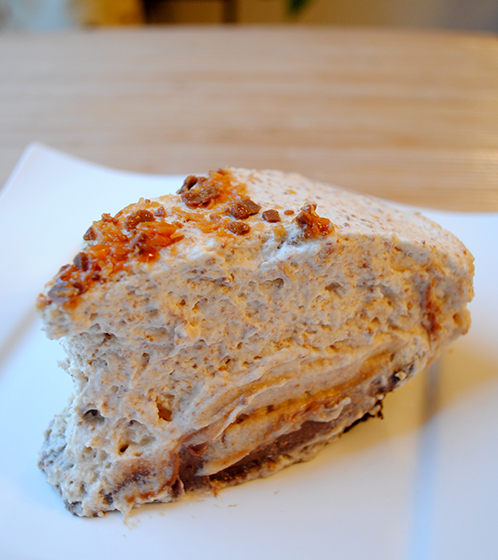
Ok first the obligatory “excuse-the-crappy-pictures.” The only decent pic was from my phone, and you can see all the junk on my counter in the background. That’s the downside of making treats for work. I don’t finish them in time the day before to take advantage of daylight, and I get up too early for decent light in the morning. Sigh, my life is so hard! 😉 But don’t let that deter you from thinking this isn’t the best pie ever. It seriously is. The texture is similar to a mousse or pudding pie and it’s got layers of sweet decadence inside. The crust is made from Oreos (can’t go wrong there) and the next layer is a mixture of chocolate, peanut butter, and crushed Butterfinger. On top of that is a layer of peanut butter custard with crushed Butterfinger and the final topping is whipped cream with crushed Butterfinger. Hello! It doesn’t quite get stiff enough to slice where the beautiful layers show, but no one is going to mind the looks after they take a bite. I seriously want to face-plant into this pie and eat my way out.

Although the directions are quite a bit of steps, it couldn’t be easier to make. The only baking required is for the crust. The rest comes from the peanut butter custard base and then each layer gets a different mix-in. If you’ve got a food processor and a saucepan, you’re good to go! I can’t say enough good things about this pie. Since it’s served cold from the fridge, this would be an excellent dessert for the upcoming warmer months. Bookmark it and thank me later!
This comes from The Candy Bar Cookbook, which is one of my favorite dessert cookbooks. So many goodies from different kinds of candy bars. I’ve also made Chocolate Chip Cookies with Hershey’s Assorted Miniatures and Milky Way Cupcakes with Caramel Buttercream (which is the best caramel buttercream EVER) from this book. It’s a must-have cookbook to add to your collection.

Butterfinger Pie
Ingredients:
Crust
14 Oreos
4 tbsp. butter, melted
Filling
7 (2.1 oz.) Butterfinger bars (1 coarsely chopped for garnish)
1/2 cup sugar
2 tbsp. cornstarch
2 cups milk (I used nonfat, but any is fine)
2 egg yolks
1/2 cup creamy peanut butter
1/2 cup semisweet chocolate chips
1 1/2 cups whipping cream (not heavy)
Topping
2 cups whipping cream
Directions:
1. For the crust, preheat oven to 375F. In a food processor, finely crush the Oreos. Add the melted butter and continue processing until well blended.
2. Transfer the mixture to a 9-inch pie pan and press evenly over the bottom and up the sides of the pan.
3. Bake for 8 minutes. Crust may slightly rise during baking. Use the flat bottom of a drinking glass to gently press down the crust. Cool completely before filling.
4. For the filling, finely chop the 6 remaining Butterfinger bars in a food processor. Divide into two 1/2-cup portions and one 1-cup portion; set aside.
5. In a medium saucepan combine the sugar, cornstarch, milk, and egg yolks. Stir constantly with a whisk over medium-high heat until mixture thickens and begins to boil. Remove from heat.
6. Add the peanut butter and whisk until smooth. Set aside 1 cup of the peanut butter mixture in a medium mixing bowl covered with plastic wrap.
7. Add the chocolate chips and 1/2 cup of the finely chopped Butterfinger bars to the remaining peanut butter mixture in the saucepan. Stir until chips are melted.
8. Pour the chocolate mixture into the cooled crust. Cover with plastic wrap so the wrap lies flat against the entire surface of the chocolate layer and refrigerate.
9. For the peanut butter layer, whip 1 1/2 cups cream until stiff peaks form. Fold in reserved cooled peanut butter mixture and 1/2 cup of finely chopped Butterfinger bars.
10. Remove pie from refrigerator and remove plastic. Mound peanut butter mixture evenly over the chocolate layer and spread to the edges.
11. For the topping, whip 2 cups cream until stiff peaks form. Fold in 1 cup of finely chopped Butterfinger bars.
12. Spoon evenly over peanut butter layer. You can let the pie set up a bit so it’s easier to spread the topping or start by spooning topping around the edges and work your way to the center of the pie. I add a few dollops at a time and used a small offset spatula to spread it. A huge dollop might sink into the peanut butter layer. You can pile the topping high in a dome shape or spread it more flat (that’s what I do). It’s A LOT of topping.
13. Sprinkle the coarsely chopped Butterfinger on top for garnish. Cover loosely (I used a cake carrier since the pie is so tall) and refrigerate until ready to serve.

 Print
Print